Overview
In October 2015, I bought a Chromebook with the intent of learning how to move my data-science development environment to the cloud. In exchange for an extra 5 minutes of setup, I now have a flexible infrastructure that can scale with the task. This setup is cross-platform in that it can be used on any laptop with Chrome, not just a Chromebook.
Brief setup:
- Start a Google Compute Engine virtual machine instance.
- Start a Jupyter Notebook server on the instance:
$ jupyter notebook --ip=0.0.0.0 --port=8888 --no-browser &
$ disown 1234(where1234is the process ID) - Create an SSH tunnel to forward a local port to the server's port on the instance:
$ ssh -f -N -L localhost:8888:0.0.0.0:8888 samuel_harrold@123.123.123.123
For Chrome Secure Shell, omit-fto keep the tunnel open (see screenshot). - View the server at
http://localhost:8888 - I use the Cloud9 IDE and connect the instance as an SSH workspace.
Motivations
Why did I move to the cloud?
- I wanted to save money.
- With a cloud-based platform, I only need a laptop as a web browser. I spent $170 on my ASUS C201 Chromebook with 4GB RAM.
- I spend about $20 per month on Google Cloud services.1
- I spend $10 per month on a Cloud9 micro plan for SSH workspaces.
- I wanted a reproducible environment. Snapshots can serve as simple backups of instances. For more complex platform managment, there's the Google Cloud Shell.
- I wanted to test the scalability of a pipeline. On a cloud platform, I can mount disks with large data sets and change the instance size to test how efficiently algorithms use CPUs and memory. Connecting other cloud services expands the possibilities.2
Why do I use Google Cloud?
Between Google Cloud and Amazon Web Services, I chose Google Cloud for its intuitive UI. SSH within the browser is very convenient.
Why do I use IPython Notebooks?
IPython (Jupyter) Notebooks are an important part of my development process since they enable me to prototype quickly and to share my work in-progress. The notebook serves as a top-level script, the parts of which I eventually modularize as components of installable packages. I prefer the Continuum Analytics Anaconda Python distribution for its Conda package manager. I'm using Python 3.5.
Why do I use Cloud9?
I saw that Cloud9 is popular and has good documentation.3 I wanted a cloud-based IDE since I didn't want to spend resources on my Chromebook or on my instances to run the IDE.
First-time setup
There are many ways to run a Jupyter Notebook server on a virtual machine instance. This is one example setup working from my Chromebook with details for newcomers:
- Create a Google Compute Engine virtual machine instance and SSH keys:
- Make a project in the Google Developers Console.
- Configure an instance:
- Machine type: Start with the smallest machine type.4
- Boot disk: Start with the default boot disk (Debian, 10GB).5
- Firewall: Allow HTTP and HTTPS connections to use
curlandwget. - Project access: Reserve an external IP address ("Networking" > "External IP"). Other settings can be left at default.6 For this example, I give
123.123.123.123as my instance's static external IP address.
- Connect to the instance, e.g. with Google's in-browser SSH.
- Update the Debian system:
$ sudo apt-get update && sudo apt-get dist-upgrade - Generate an SSH key pair for the instance and might as well connect to GitHub.7
- Start a Jupyter Notebook server on the instance from the in-browser SSH:
- Install Python on the instance.
- Start a Jupyter Notebook server:
$ jupyter notebook --ip=0.0.0.0 --port=8888 --no-browser &
$ disown 1234(where1234is the process ID)8
- Create an SSH tunnel to forward a local port to the server's port on the instance:
- Generate an SSH key pair for the Chromebook as above9 and add the Chromebook's public key to the instance's
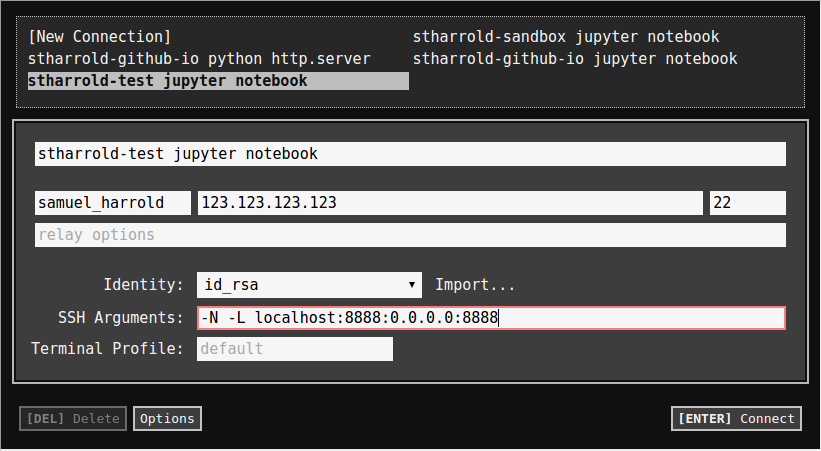
authorized_keys.10 - Within Chrome, install Chrome Secure Shell and forward a port (see screenshot above):
Username: samuel_harrold(in the instance's shell, runwhoami)
Hostname: 123.123.123.123(the instance's external IP address)
Port: 22
Identity: id_rsa11
SSH Arguments: -N -L localhost:8888:0.0.0.0:888812 13 - View the server at
http://localhost:8888.
- Generate an SSH key pair for the Chromebook as above9 and add the Chromebook's public key to the instance's
- For an IDE, connect a Cloud9 remote SSH workspace to the instance:
- Install Node.js on the instance.
- Create a Cloud9 SSH workspace, copy the public SSH key from Cloud9 to the instance's
authorized_keysas above, then open the workspace:14
Username: samuel_harrold(in the instance's shell, runwhoami)
Hostname: 123.123.123.123(the instance's external IP address)
Initial path: /home/samuel_harrold
Port: 22
Node.js binary path: /usr/bin/nodejs(in the instance's shell, runwhich nodejs)
- To shutdown the instance:
- Close the Jupyter Notebook and the Chrome Secure Shell tabs. Kill the Jupyter Notebook server.15
- Close the Cloud9 workspace tab.
- "Stop" the instance in the Developers Console.
- For a simple backup of the instance, create a snapshot from the Developers Console. This can be done while the instance is running.
- To change the instance's machine type or disk size:
- Shutdown the instance as above.
- Create a snapshot of the instance.
- Clone the instance but set the new boot disk to the new snapshot and...
- ...if changing the machine type, set the new machine type.
- ...if changing the disk size, set the new disk size.
- Reassign the external IP address to the new instance.16
- Start the Jupyter Notebook server on the instance and create an SSH tunnel as above.17
- Open the Cloud9 workspace.
Helpful links
Some links I found helpful for this blog post:
- Chrome:
- Chrome app Secure Shell.
- Chrome app cookies.txt to export cookies from Chrome for
wget. - To inspect system resources,
chrome://systemin Chrome's address bar. - To inspect RAM usage by Chrome,
chrome://memory-redirectin Chrome's address bar (from the Chrome Task Manager).
- Chromebook:
- Chromebook 2GB vs 4GB Demo. I had to upgrade from a 2GB RAM Chromebook to a model with 4GB RAM since I typically use about 2.5GB RAM while working.
- Using a Chromebook as a developer. I've had my Chromebook for 2 months and haven't yet needed developer mode.
- Low-profile flash drive to expand the Chromebook's storage.
- Chromebook app SFTP.
- Chomebook app Caret text editor.
- Linux:
- Classic Shell Scripting (2005, O'Reilly) was my formal introduction to Bash and Linux/Unix.
- Choosing between Debian and Ubuntu.
- Updating a Debian system.
- SSH login without password.
- SSH port forwarding (tunnels) explained.
- Google's recommended best practices for securing communications with Compute Engine instances.
wgetvscurlwith examples- StackExchange Unix and Linux download from Google Drive with
wget - Download from Kaggle with
wget disownexamples.
- IPython (Jupyter) Notebooks:
Acknowledgements
Thanks to John and Julie for their early reviews.
- John Jardel: http://thewannabedatascientist.blogspot.com
- Julie Hollek: https://github.com/jkru
Footnotes
-
As of Dec 2015 on Google Compute Engine, running a 1-core shared virtual CPU instance with 0.6GB RAM costs about $4.50 per month. Running a 32-core virtual CPU instance with 120GB RAM costs about $1.12 per hour. ↩
-
There are also hosted services like Continuum Analytics Wakari, Google Cloud Datalab, Cloud9 hosted workspaces, and Digital Ocean. ↩
-
As of Dec 2015, Cloud9 doesn't support debugging in Python. However, this hasn't been a problem for me since I use pdb for debugging and pytest for testing. I use the IDE mostly for code navigation, autocomplete, and managing packages with many files. ↩
-
Determine if more RAM is necessary by using
free -mto display the free memory (RAM) in MB. Use the Developers Console to determine the CPU utilization. ↩ -
Determine if more disk space is necessary by using
df -B MBto display the free disk space in MB. ↩ -
Reassigning a static external IP address to a new instance when changing instances is often more convenient than changing an ephemeral IP address in all connections to the instance, e.g. in Chrome Secure Shell and Cloud9. ↩
-
For Google's in-browser SSH,
xclipdoes not function. Copy the public key fromless. ↩ -
Disowning a background process (the control operator
&) from the shell allows a process to continue running in the background when the shell is closed. ↩ -
To create an SSH key pair for the Chromebook without going into the laptop's developer mode, generate an extra pair of keys on the instance as above then move them to the Chromebook. I save mine under
Downloads/ssh(no dot-file access without developer mode). Transfer the keys by copy-paste usinglessfrom instance's in-browser SSH and a text editor app for Chromebook or download them from a connected Cloud9 SSH workspace: right-click the file > "Download". ↩ -
To append a local public SSH key, e.g.
id_rsa.pub, to a remote machine'sauthorized_keysfile, in the instance's in-browser shell:
$ cat >> ~/.ssh/authorized_keys
[Ctrl+V to paste the local public key, then Enter]
[Ctrl+D to signal end of file]↩ -
Select both of the Chromebook's private and public keys,
id_rsaandid_rsa.pub, to import as a pair. ↩ -
Omit the
-foption to keep Chrome Secure Shell's tunnel open. Pin the tab in Chrome (right-click the tab > "Pin tab") to keep Chrome Secure Shell open and minimized in the browser. ↩ -
To paste the password for the Chromebook's SSH key, use Chrome's paste function ("Customize and control" > "Edit" > "Paste"; using Ctrl+V will input
^vas the password). In place ofssh-addon my Chromebook, I use LastPass to manage passwords. ↩ -
If the Cloud9 workspace fails to connect to the instance, e.g. the terminal within the workspace doesn't receive input, run the Cloud9 dependency installation script then reopen the workspace:
curl -L https://raw.githubusercontent.com/c9/install/master/install.sh | bash
(requires HTTPS traffic allowed in the instance's firewall settings) ↩ -
In the instance's in-browser SSH:
$ lsof -i:8888(list process IDs filtered by port)
$ kill 1234(send a termination signal to the process ID)
(installlsofwithsudo apt-get install lsof) ↩ -
In the Developers Console, manage IP addresses under "Products & services" > "Networking". ↩
-
Because the external IP address was reassigned to a new instance, a warning will appear that the remote host identification has changed. To remove the offending ECDSA key from
known_hosts, in Chrome, open the JavaScript console (Ctrl+Shift+J) and runterm_.command.removeKnownHostByIndex(idx)where idx is the given line number inknown_hosts, e.g. from the warning lineOffending ECDSA key in /.ssh/known_hosts:1, idx=1. ↩
Comments
comments powered by Disqus